Growing Your Own Food
Spring has finally sprung! We hope so anyway. With Spring finally making its presence known over the last week or so, the time has come to get back into the garden and allotments to start growing your own food. In this blog, I will share my experience from visiting my dad’s allotment.
Potatoes
Just before all the snow came our way, my dad managed to get his soil turned over in preparation for the new season and when he got back into the allotment he started planting his potatoes. Before planting potatoes, it is important to remember that if you planted potatoes last year to try and change where you plant them this year. Crop rotation is very important to avoid nutrient depletion in your soil and also lessens the need for pest control.
The types of potatoes my dad has planted are:
- Roosters
- Charlottes
- Maris Piper
At the start of the process, once the soil was ready, he used a dibble, also be known as a dibber or a dibbler, to create small holes in the soil for the potatoes to go in.

To make sure your holes are in a straight line, you can use a piece of string attached to two pieces of wood stuck into the ground. Enter the potatoes into the small holes, then turn the soil over the potatoes until they are ready to be dug up.

Vegetables
My dad’s potatoes were his first priority. He usually starts planting his vegetables at the end of April, but with the unpredictable weather this year that might get pushed back a few weeks. The vegetables he plans to plant are:
- Turnips
- Beetroot
- Parsnips
- Onions
- Cabbage
- Carrots
- Brussels Sprouts
The process he goes through for planting his vegetables that comes from seeds, is to use a piece of string to mark out a line, then create a hole across where the string is and sprinkle seeds into the gap.
He will plant his cabbage just like you plant a flower in the garden. He also starts off planting his cabbage outside (in the space you can see in the photo below) then moves them into his greenhouse.

Brussels sprouts require cool weather which is handy here. Don’t panic if they don’t come up quickly. They are slow growing so will appear around autumn time.
Some advice for planting onions is to plant them in an area of the garden that gets the sun but can also be sheltered. Also, try and avoid planting them in freshly manured ground as this could lead to the onion rotting. One other thing is that birds could try and lift them out, so make sure to carefully lift off the loose skin at the top of the set.
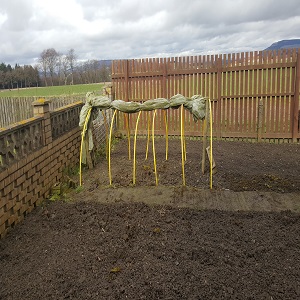
My dad will also be planting peas. The first thing to make sure of is that your soil is not wet or cold when you’re planting them or they might rot. Once your peas have been planted, it is a good idea to protect them from the elements with some sort of wiring. You can see an example of what my dad is using to protect his peas in the images below. To encourage good growth, it is a good idea to water your peas at least once a week.


Water
It is important to have some water storage in your growing space. Luckily my dad managed to get a fair bit stored up over the winter months (as shown below in the image), which will come in handy when we go through any periods of not having much rain. A good source to gather water is to install a gutter onto your shed that runs into a bucket like you can see below.

Compost
Now is a good a time as any to start collecting for next year’s compost heap if you have the space available.

Spruce up your shed!
A good idea for if the colder weather comes back is to spruce up your shed or fence. A fresh coat of paint on your shed or fence will give a cleanness to your garden for when the springtime comes around.

I hope you will find this advice helpful, and fingers crossed the weather stays good so we can all get out into the garden and get the chance to grow lots of our very own food!
Greener Kirkcaldy run a programme of Grow Your Own workshops to help people learn the skills to grow fruit and vegetables in their gardens or allotments. See the events page for upcoming workshops.
|