Sparkling Elderflower Wine
The elder (or Sambucus nigra) is really rather a common tree in this part of the world. A native to the UK and much of Europe, it is easily distinguishable by it’s umbels of upward-facing creamy little flowers in June with their distinctive fresh and fruity scent, later turning into downward-hanging little black berries. Both the elder flowers and elderberries are edible when cooked although mildly poisonous when eaten raw. I like to eat a few flowers straight from the tree but you shouldn’t have too many. (If you’re unfamiliar with elders, please check with someone who knows what’s what before you pick anything. Keep in mind that ground elder has similar flowers but is a different plant. Don’t take more than you need and only pick a few from each tree so as none of them are left fruitless.)

It was recently suggested that I do a blog on elderflower “champagne”, a delicious mildly alcoholic summer drink. I have never made it myself but am very familiar with it as my grandpa in Wales used to make it every summer.
You will need:
- a big container that won’t be corroded by lemon
- wooden spoon
- muslin cloth and sieve
- jug or ladle for pouring
- another container or large jug
- funnel
- bottles (I use plastic fizzy pop bottles – I’ll explain why later)
- elderflower, sugar, vinegar, lemon(s)
- a little patience
My grandpa doesn’t remember the recipe he used so I’ve sort of made up my own based on the sorts of quantities other people suggest, combined with ease of measurement. I just made a very little batch as I only have a small brewing container but you may wish to multiply the quantities for a bigger volume. (You can find links to the recipes of more experienced elderflower brewers at the end of this blog.)

Here are the quantities I used for my first attempt:
- 2 litres warm water
- 12oz sugar
- 1 lemon
- 1tbsp vinegar (I used white wine vinegar)
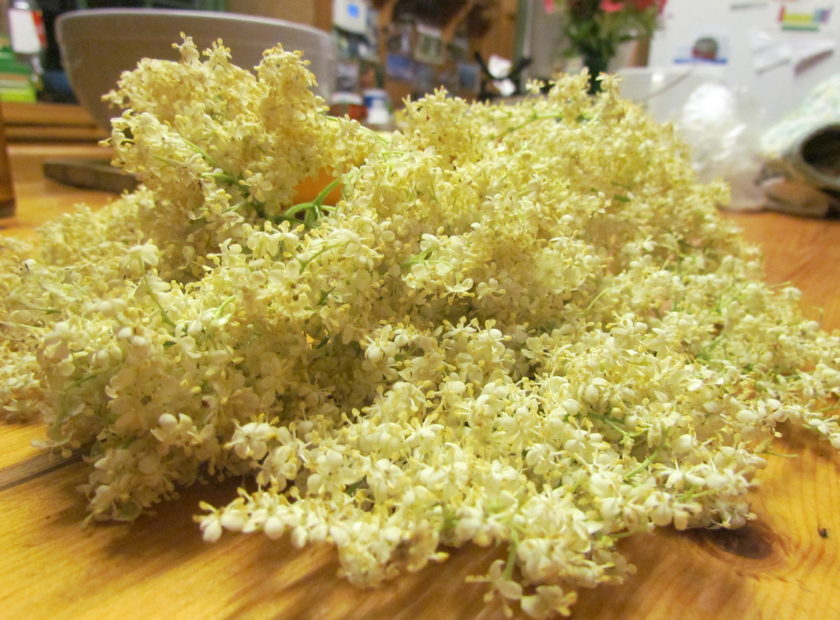
- 3 large elderflower heads (unwashed – lightly shake off any bugs)
- You may need to add a little yeast if the mixture doesn’t spontaneously ferment – with luck, there should be wild yeast already present in the elderflower.
Method:
- The first step is to sterilise your container and spoon as best you can. The buckets in our house have been used for various purposes so rather than risk contamination, I’ve decided to make little batches in a big mixing bowl instead. I filled it with hot water from the kettle to sterilise it (80 degrees celcius should be enough – you don’t want to damage your container), left it a few minutes then emptied it out.
- I filled it with 2 litres of warm water and mixed in the sugar till it dissolved.
- If the water is hot, wait for it to cool a bit as high temperatures can kill yeast.
- Chop up the lemon, measure out the vinegar and add this to your solution along with the elder flowers.
At this stage, it should look a bit like this:

Next, drape a muslin cloth over the top and leave it in a cool airy place where it won’t be disturbed. Do not leave unattended in the interim in case your brother comes in for a sandwich and says “Oops… Was there anything in that bowl?” before you find that he’s stuck a lettuce in it … In such an emergency, forgive said brother, get a dry cloth and hope he hasn’t contaminated your brew. Leave it for 24-48 hours to begin fermenting. If after this time, it is showing no sign of fermenting (eg. foam, changing scent), you may wish to add a little yeast.
…Five days later and I see bubbles when stirred (despite neglecting to add yeast) and its reminiscent smell is beginning to develop a vaguely alcoholic twist, so I have now bottled it. Tasted it too – lovely but still syrupy sweet.

Once fermentation is under way, it’s time to bottle up: Line a sieve with muslin and ladle your brew through it into another container (everything should be sterilised – run boiling water through the muslin and sieve beforehand). Once you’ve sieved out the solid bits, use the funnel to fill up your sterilised bottles. Now for the important bit: To prevent a build-up of potentially explosive gas during the fermentation process, my grandpa learned from experience not to screw the lids down fully. This is also why he started using plastic bottles – exploding glass can be very dangerous. Another trick people use (short of investing in specially-designed champagne bottles and corks) is to screw lids on tight but ‘burp’ the bottles daily by unscrewing just enough to let the excess gas escape.
In two weeks, it will have matured enough to drink but can be kept for several months at least, longer if you sterilised everything well. The longer you leave it, the dryer it will become as the sugar converts to alcohol.
I’ll have to wait and see how mine turns out…
Sources:
|